When it comes to organizing your content in Google Docs, tables can be considered heaven-sent. But in certain scenarios, you might find them unsuitable for your document, no longer needed, or perhaps, you simply want to delete your table to make space for other elements.
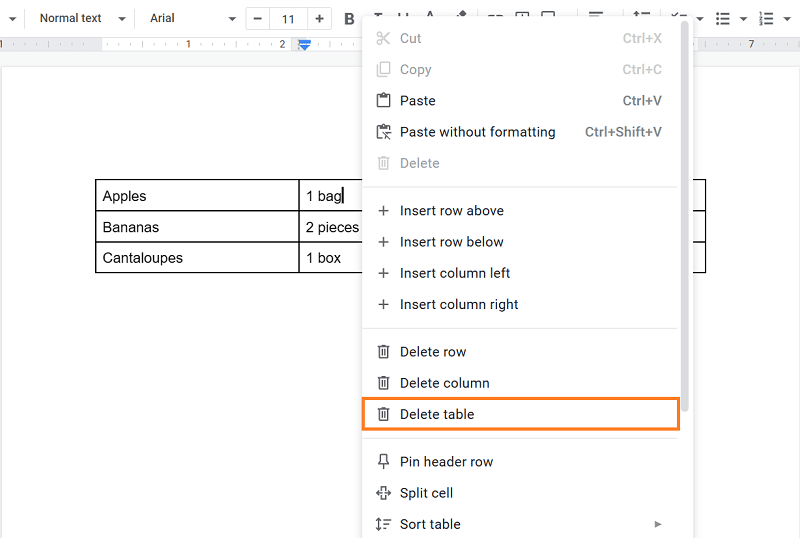
To remove a table, simply right-click on any of its cells and find the “Delete table” option on the context menu that pops out.
That’s easy, right? But there are other and more straightforward methods of how to delete a table in Google Docs. In this article, we’ll explore how you can do it on PCs, Macs, the mobile app version of the tool, and more.
Table of Contents
Crash Course on Google Docs Tables
Regardless of the platform, people use tables to organize their content. They consist of a grid with cells that can be filled with text, numbers, and more. You might use them to create a schedule for your class, list trip essentials, or simply display your data cleanly.
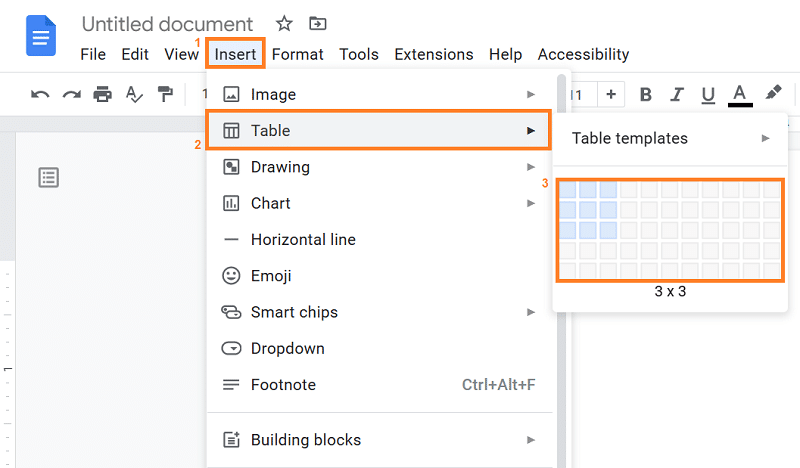
To create a table in Google Docs, simply click on “Insert” > “Table” and specify the number of rows and columns you want in your document. You can also customize its colors and border weights according to your taste using other software features available.
While tables help to organize your information, they sometimes produce clutter in your document with their spacey borders, especially when you are dealing with large tables. They might also cause formatting issues, like uneven text wrapping. That’s why it’s important to learn how to delete a table in Google Docs, you can remove them from your documents when needed.
How to Delete a Table in Google Docs on PCs
Getting rid of a table on the platform is a simple and quick process. Here are four easy steps to delete a table using a Windows device.
- Go to Google Docs and open your document
- Locate your table and hover on one of its cells
- Right-click on your mouse and a context menu should appear
- Find the “Delete table” option from the list and click on it
Alternatively, you can also take an easier approach by using either the “Delete” or “Backspace” keys on your keyboard. Simply select all the cells of your table, then press on either of the keys mentioned. And there you go!
NOTE: Keep in mind that deleting a table in Google Docs will also remove all the content inside it, so make sure to save any important information before deleting the table.
How to Delete a Table in Google Docs on Mac
Compared to other word processors, Google Docs is actually web-based — it’s got the same features on any kind of device as long as you access it from a browser. Therefore, you can easily delete your tables on your Mac by performing the steps we’ve provided for PC users.
There are also other methods to do this (that are also applicable for PCs), including using the “Format” menu at the top of the software. To do so, follow the steps below.
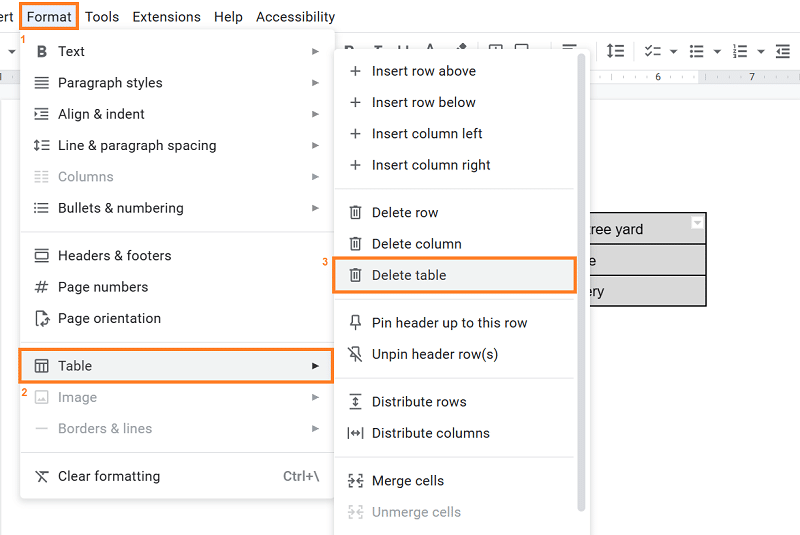
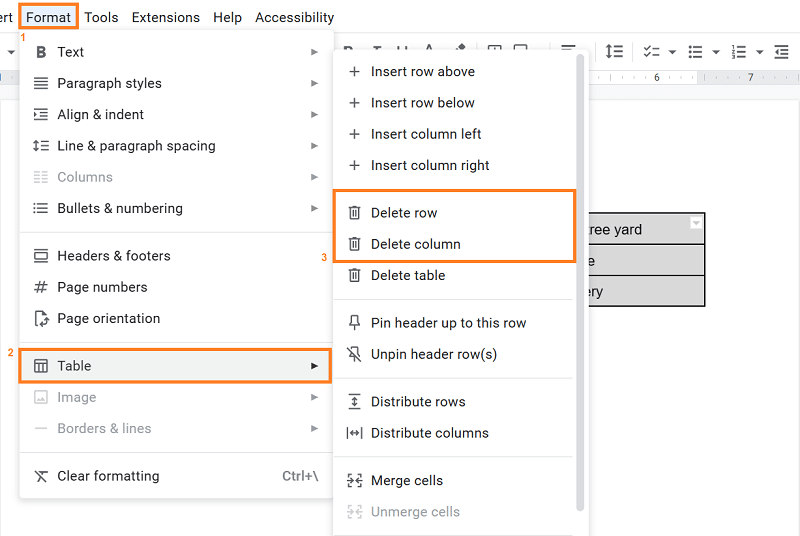
- Start by selecting your table
- Click on “Format” at the menu bar
- Toggle “Table” > “Delete table”
How to Delete a Table in Google Docs but Keep the Text
Of course, it’s also possible to preserve the contents of your table even after deleting it. But the only solution to this is a workaround that doesn’t really mean you’re removing the table itself — it’s just the visuals you’re changing.
The concept here is to remove the borders of your table, which are the vertical and horizontal lines that define its cells. Here’s how you can accomplish it.
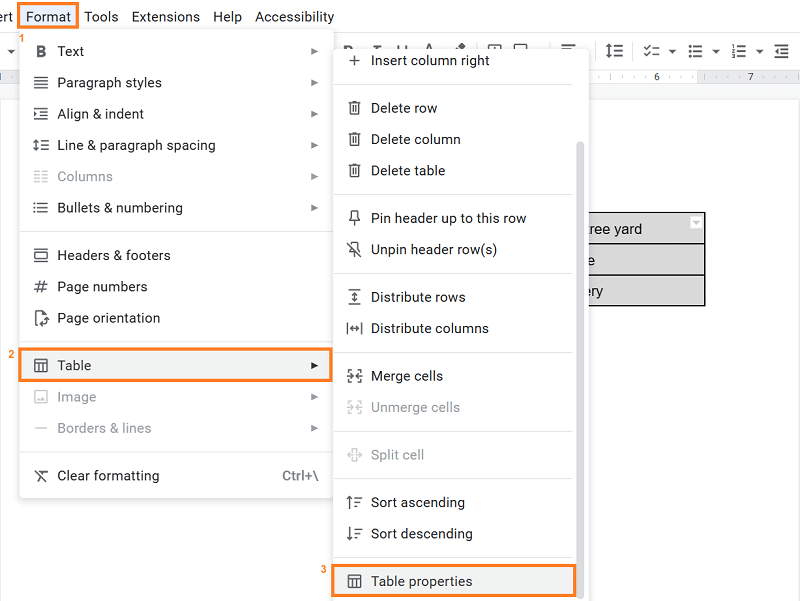
- On your document, select all the cells of your table
- Locate “Format” from the menu bar at the top of your workspace
- Go to “Table” > “Table properties”
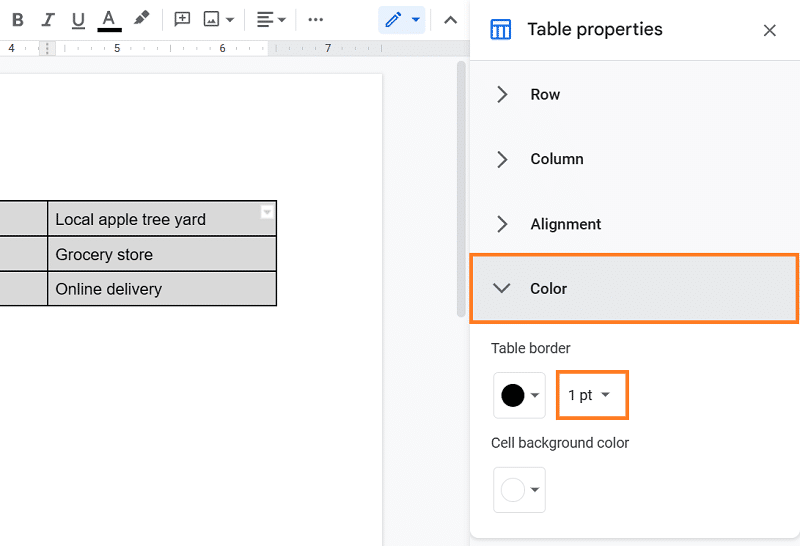
- Toggle “Color,” and you should see the options for the table border and cell colors
- Under “Table border,” click on the drop-down menu located on the right
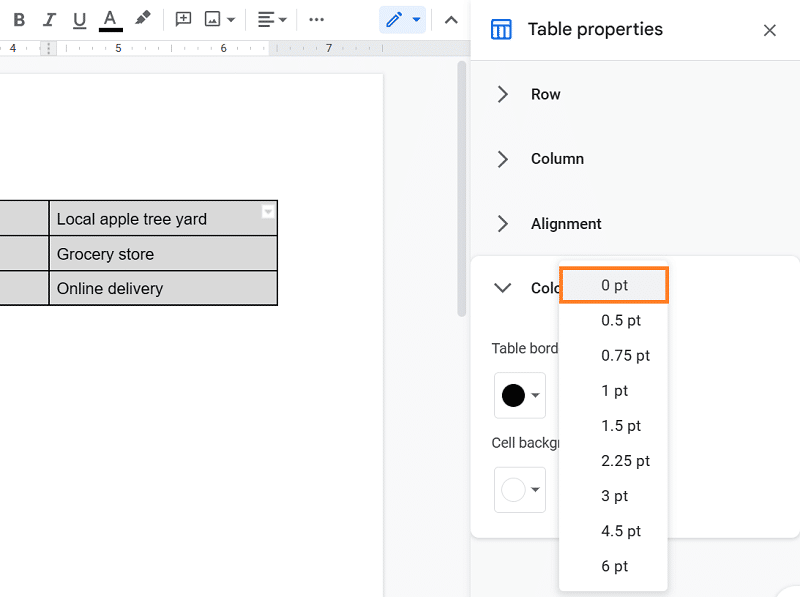
- Select 0 pt from the list, and you’re done
You can also access the Table properties menu by performing a right-click after selecting your table’s cells, and it’s even quicker that way!
How to Delete Part of a Table in Google Docs
There are also occasions when you want to delete some parts of your table but not the entire thing. For example, you might have generated a higher number of rows and columns than you need. Here’s how to delete the excess columns or rows.
- Start by selecting a row or a column on your table
- Go to “Format” > “Table”
- To remove a column, pick the “Delete column” option
- To remove a row, click on “Delete row” instead
The only downside of this method is that you can only delete whole rows or columns at a time in Google Docs. This means you can’t remove individual cells from your table. Hence, you can either leave the extra cells blank or choose to remove the entire row or column containing them.
How to Delete a Table in the Google Docs Using a Mobile App
Google Docs also has a mobile app version, which comes in handy when you’re away from your desktop or have an iPad as your primary device. This works differently from the web-based version on your computer, though, which would require you to follow a different set of steps to delete your tables.
Here’s what you should do.
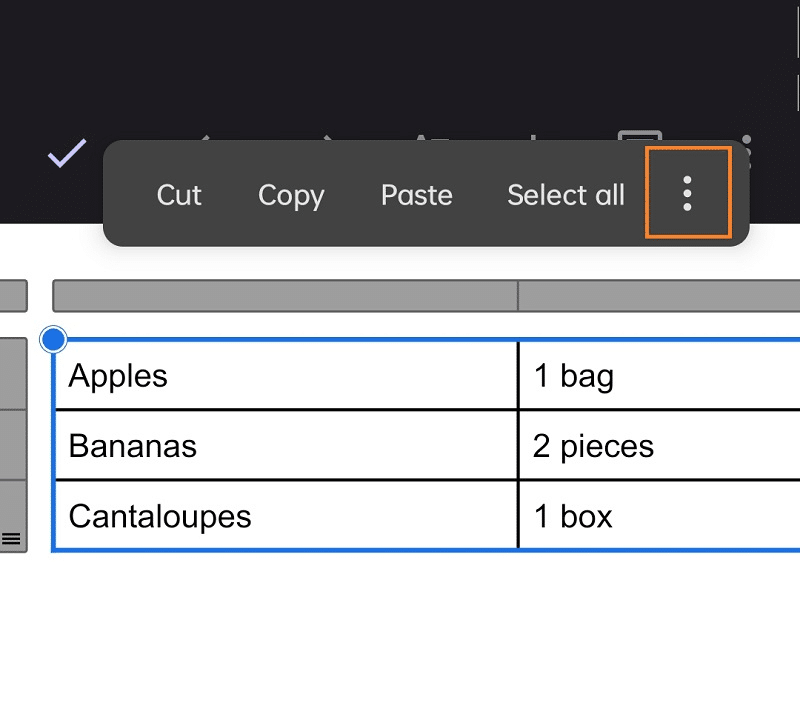
- Open the Google Docs app on your phone or tablet and launch your file
- Select all of your table’s cells by long-pressing and dragging the markers
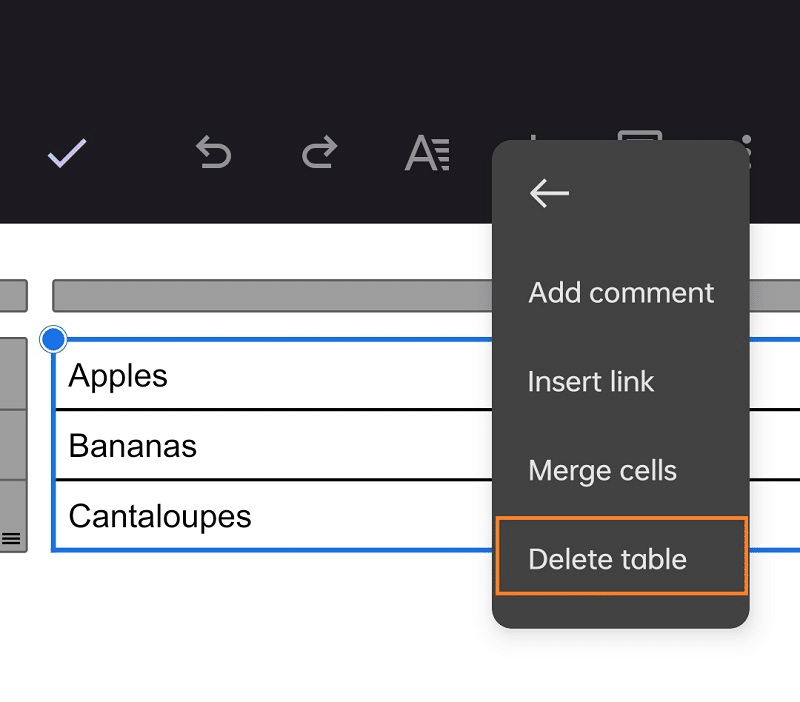
- From the context menu that will pop out, press the symbol with three vertical dots
- Toggle “Delete table,” and you’re finished
You can also delete specific rows or columns inside the mobile app, and the steps are almost identical to what we’ve discussed by far.
To remove a column, you want to select an entire column instead of highlighting all cells. Then, select the vertical three dots on the context menu and press “Delete column(s).” Just replicate the process for rows if needed by selecting “Delete row(s)” this time.
Is There a Way to Recover Deleted Tables in Google Docs?
What if you suddenly changed your mind about getting rid of your table but have already deleted it? Here are some ways you can retrieve them.
Using the Undo Feature
If you only deleted your table moments ago, the undo function might still work for you. To do this, simply press Ctrl + Z (Cmd + Z for Mac) on your keyboard. In case you can’t remember these shortcut keys, you can also click the curved arrow that points to the left in the Google Docs toolbar.

Restoring Previous Versions
Another way to reset your changes is to restore a previous version of your whole document. This not only brings back your table but also means that all other modifications you’ve done inside your file would also be reverted.
Here’s how to do it:
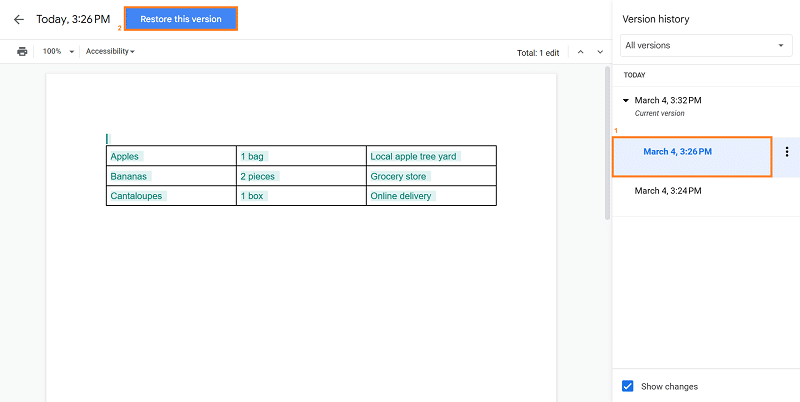
- Click on “File” > “Version history” > “See version history.”
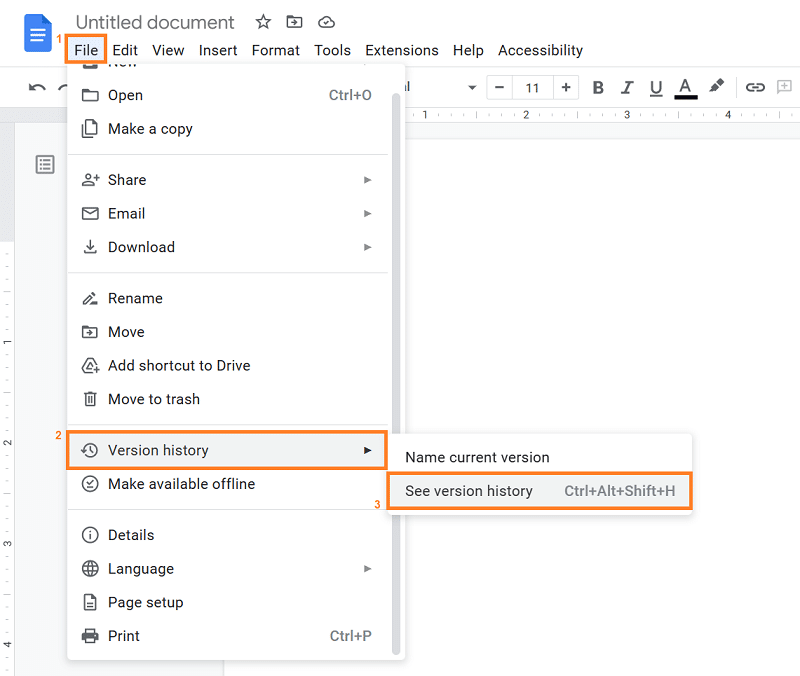
- On the right side of your screen, you’ll see various versions with timestamps that you can view. Simply find the version that contains your table and click the “Restore version” button at the top.
Final Thoughts
Tables are great when you need to keep your data tidy. Unfortunately, they can be somewhat unpleasant to the eyes if there are many rows and columns. Simply use any of the methods we’ve discussed on how to delete a table in Google Docs to solve this.
For more tutorials, our collection of articles at Spreadsheet Point is waiting for you. Alternatively, if you’re wanting to improve your Google Docs to make them more professional, you can use the Grammarly tool to ensure your document is error-free.
Related:
- How to Make a Table in Google Sheets (Easy Tips)
- How to Insert Signature in Google Docs [Easy Guide]
- How to Add Page Numbers in Google Docs [Ultimate Guide]
- How to Check Word Count on Google Docs [Easy Guide]
- How to Make Columns in Google Docs [Complete Guide]
- How To Insert Arrows in Google Docs [Easy Guide]