Grouping objects in Google Slides streamlines the editing process by enabling users to move, resize, or apply formatting to a collection of objects. This enhances the efficiency of your presentation design.
To group objects in Google Slides, select multiple objects (images or shapes) by holding the Shift key and clicking on them. Right-click on the selected objects and select “Group” from the context menu.
This guide outlines how to group in Google Slides to enhance presentations and deliver visually appealing content.
Table of Contents
What Is Grouping in Google Slides?
Grouping in Google Slides is an essential feature that allows users to manage multiple elements more efficiently.
By learning how to group things on Google Slides, it’s easy to move, resize, or modify a set of elements together (including images, shapes, and objects) without making individual adjustments. This capability can greatly enhance the workflow of your presentation design process, saving you time and effort.
Practical Applications of Grouping in Google Slides
Grouping objects in Google Slides offers several benefits, including the following:
- Aligning and distributing multiple elements evenly across the slide
- Creating consistent design elements throughout your presentation
- Managing complex slide layouts with multiple layers of objects
How To Group in Google Slides
To group objects in Google Slides — and manage them collectively — simply follow the steps below:
Selecting Objects to Group
Before learning how to group items in Google Slides, you must know how to select them. You can choose a single element simply by clicking on it. To select multiple objects at once:
- Click on the first object.
- Hold down the Shift key, Ctrl key (on Windows), or Control key (on Mac for non-adjacent objects.
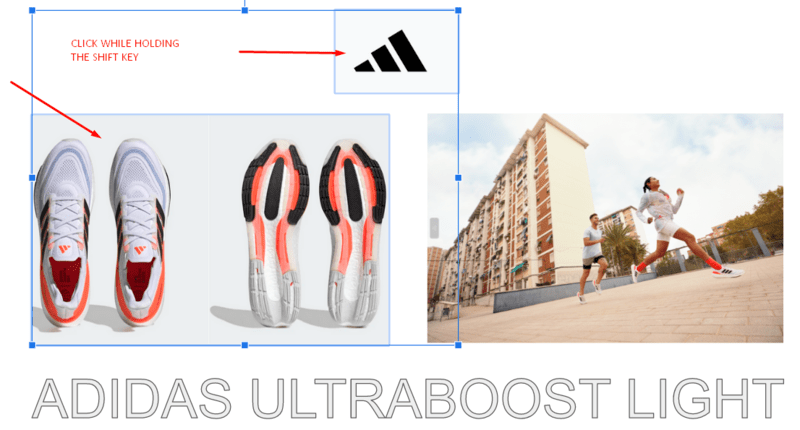
- Click on additional objects to add them to your selection while holding down the Shift (Windows) or Control (Mac) key.
You can also click and drag a selection box around the objects you want to select. This method only works when several objects are close together on the slide.
Grouping Objects in Google Slides
Next, let’s explore how to group images in Google Slides:
- Select the objects you want to group (follow the methods explained in the previous section).
- Right-click on one of the selected objects and select “Group” from the menu that appears. This will group the selected objects together, allowing you to move, resize, and edit them as a single unit. You can also press Ctrl + Alt + G (for Windows) or Command + Option + G (for Mac) to group them using a keyboard shortcut.
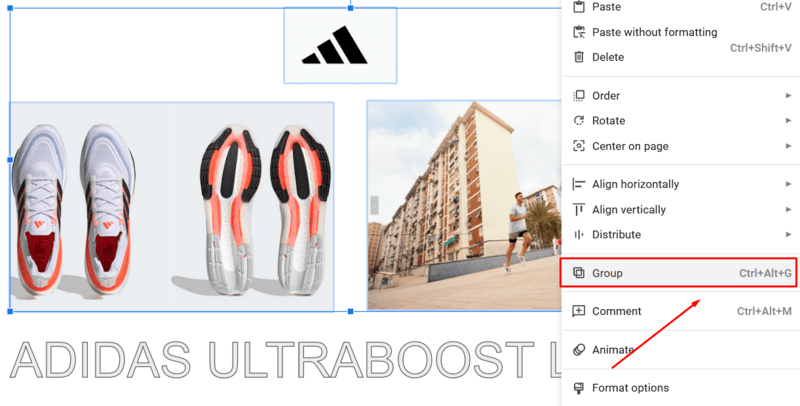
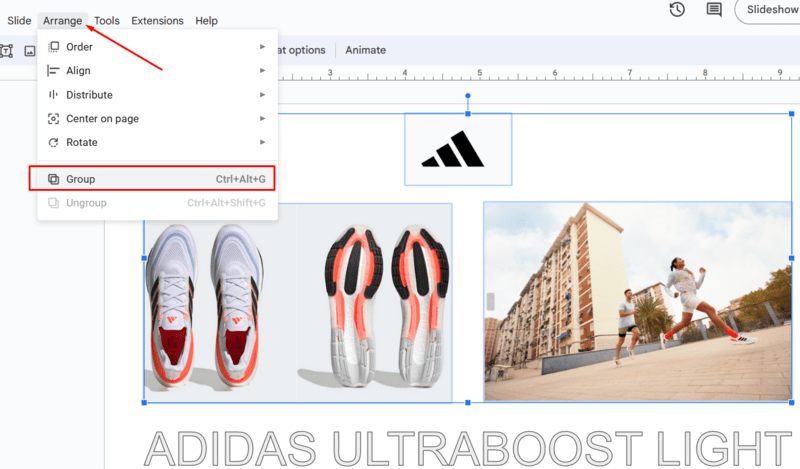
Alternatively, you can use the “Arrange” menu at the top of the screen to group objects. Click “Arrange” > “Group” from the drop-down menu.
Modifying and Editing Grouped Objects
Once you’ve grouped objects in Google Slides, you may find it necessary to modify or edit them. If you want to edit individual objects within a group, double-click on the object you wish to modify. This allows you to make changes without ungrouping the entire set.

If you need to add a new object to an existing group, you’ll first have to ungroup the objects. Next, select the new object — along with the original objects — and regroup them using the steps mentioned earlier.
How To Ungroup in Google Slides
To ungroup the objects later, follow these steps:
- Select the grouped object by clicking on it.
- Right-click on the grouped object and select “Ungroup” from the context menu. You can also use the keyboard shortcut Ctrl + Shift + G (for Windows) or Cmd + Shift + G (for Mac) to ungroup them.
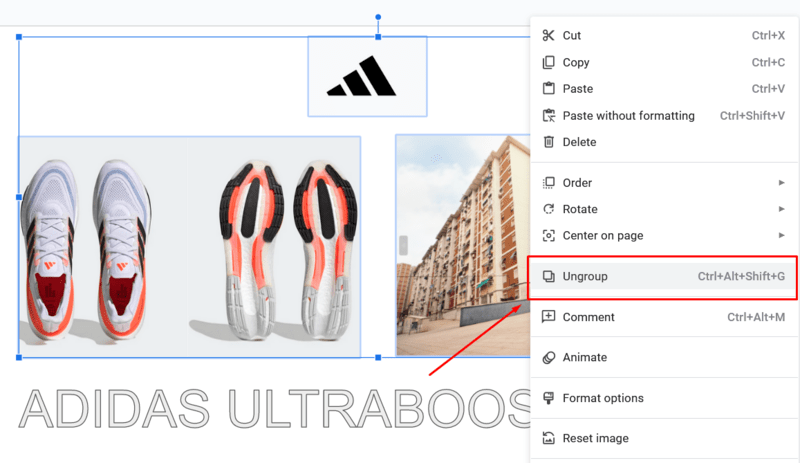
Alternatively, you can select “Arrange” > “Ungroup” from the menu bar.
Why Can’t I Group Objects in Google Slides?
Sometimes, users encounter difficulties when trying to group objects in Google Slides. These issues can arise for several reasons:
1. Only Certain Elements Can Be Grouped
Google Slides allows you to group images and shapes — not text boxes. Make sure you’re selecting the appropriate types of elements for grouping.
2. Elements Must Be on the Same Slide
Grouping can only be performed with elements on the same slide. Ensure all objects you want to group are on the same slide.
3. Multiple Objects Must Be Selected
The group option will only be available if you select multiple objects. To select multiple objects, click and drag — or hold the Shift key — while clicking each object individually.
Incompatible Elements
Some objects (such as inserted YouTube videos) cannot be grouped. If you cannot group certain items, make sure they are compatible for grouping.
Additional Tips for Grouping Items in Google Slides
Learning how to group objects in Google Slides is essential for effective presentation design. There are additional tips to help you maximize the benefits of this feature. Here are some of them:
1. Use Layers Strategically
Consider organizing your content using layers when working with multiple elements in your presentation. This approach can enhance your ability to manage elements efficiently and improve the overall design of your slides.
2. Duplicate Grouped Elements
If you need to reuse a set of grouped elements on multiple slides, it’s easy to duplicate them. Select the group, press Ctrl + D (for Windows) or Cmd + D (for Mac), then copy the duplicated group to other slides as needed.
3. Combine Grouping With Other Features
Grouping becomes particularly powerful when combined with other Google Slides features, such as animations, transitions, and formatting. You can simultaneously apply these effects to multiple objects by grouping elements, resulting in more dynamic and engaging presentations.
Final Thoughts
Grouping objects in Google Slides can significantly enhance your presentation design by allowing you to create various layouts and arrangements. Understanding when to group or ungroup elements is key to working efficiently.
Once you start mastering the art of grouping in Google Slides, you’ll take your presentations to the next level.
Looking for spreadsheet templates to kickstart your work? Discover our premium templates today and enjoy 50% OFF with the code “SSP.”
Related:
- How to Delete a Slide on Google Slides [Easy Guide]
- Learn How to Draw on Google Slides in 2 Minutes (Too Easy)
- How to Make Google Slides Vertical in Under 2 Minutes
- How to Add a Video to Google Slides [Complete Guide]
- How To Insert Google Slides Icons [4 Simple Methods]