So, how do I track changes in Google Docs? Tracking changes is an easy process to grasp. The quick version is to open the document. Then, click on the “File” menu, select “Version History” from the drop-down menu, and click on “See Version History.” Or, if you prefer to use keyboard shortcuts, then you can press Ctrl + Alt + Shift + H (Windows).
Table of Contents
How To Track Changes in Google Docs Using Version History
Before we begin, ensure you’re either an editor or the document owner so you can do the following steps. If you’re not, you must request editor permission from the document’s owner to enable tracking.
Note: You can only do this if you’re the owner of the document or set as an editor. Viewers of such documents cannot access any features that allow you to view or track changes in Google Docs.
If you want to learn more about tracking changes in Google Docs or using other features while tracking these changes, read on.
How To Turn on Track Changes in Google Docs
To help you track changes in Google Docs, follow the steps below:
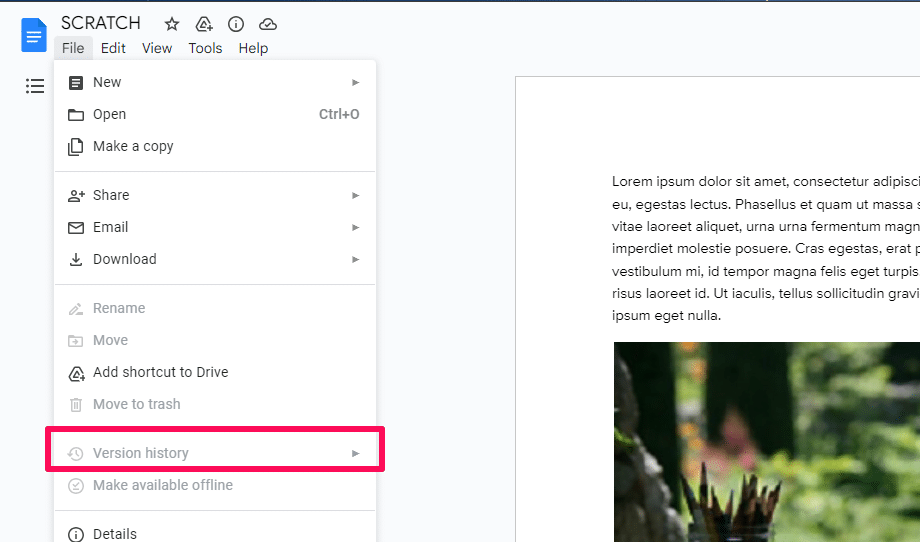
- Open the document where you want to track changes.
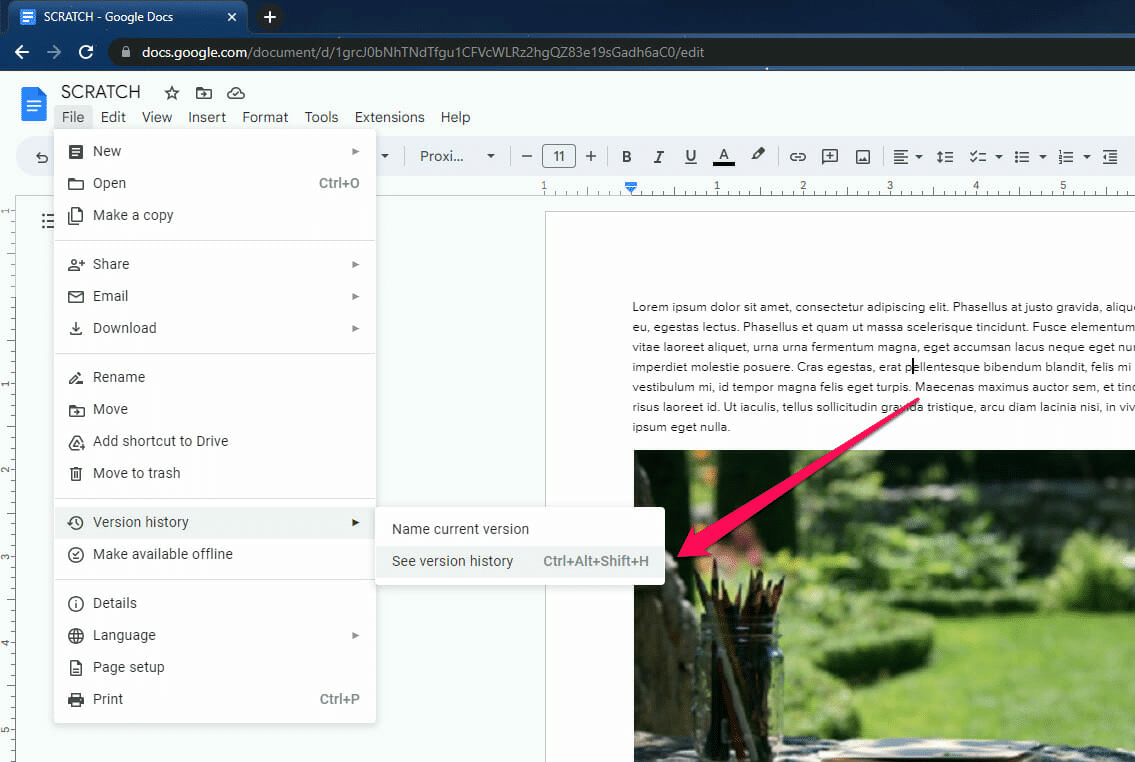
- Once it’s open, click the “File Menu” and move your cursor to “Version History.”
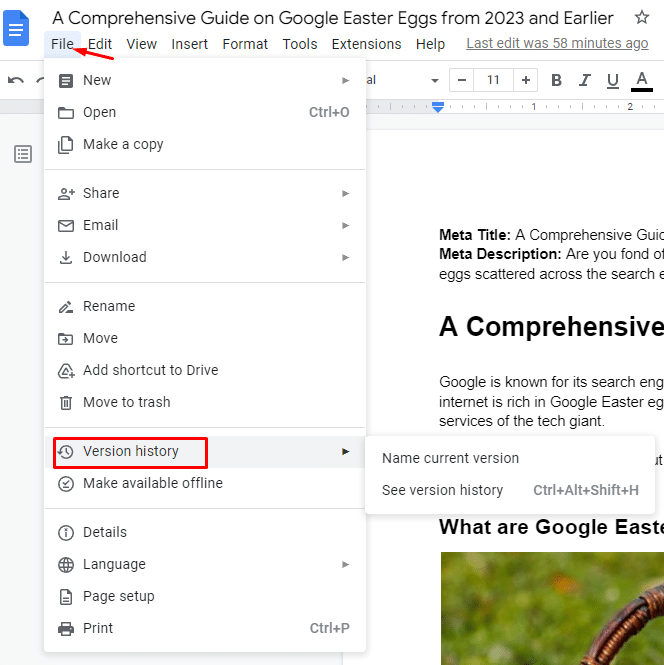
- Next, tap “See Version History.”
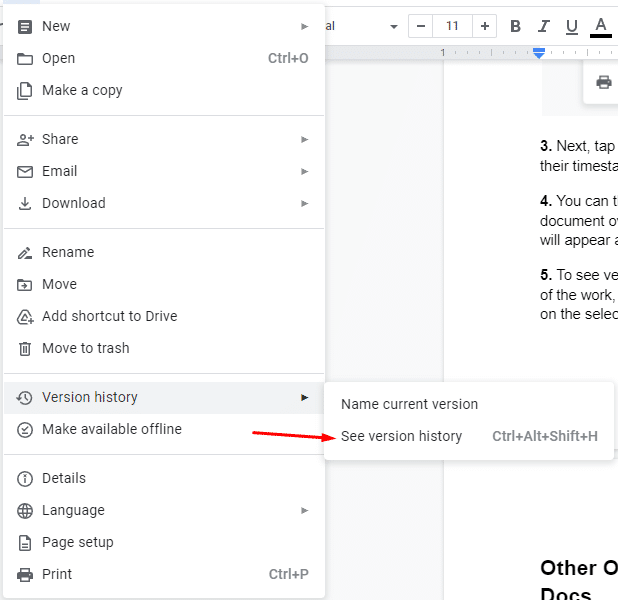
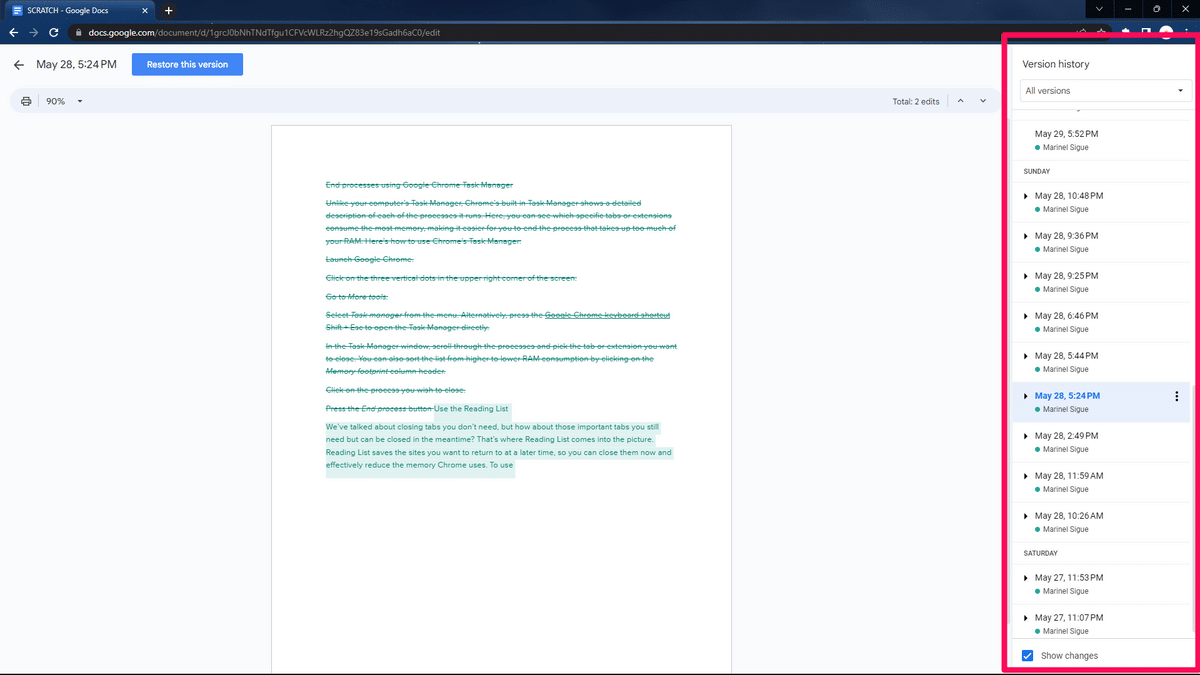
- Upon clicking, you’ll see a drop-down menu on the right, showing a list of the past versions.
- Here, you will see the dates, time stamps, the current version of the document, and the names of the collaborators who edited the document.
- This feature allows you to track the changes made to the document, which is especially useful when there are multiple collaborators.
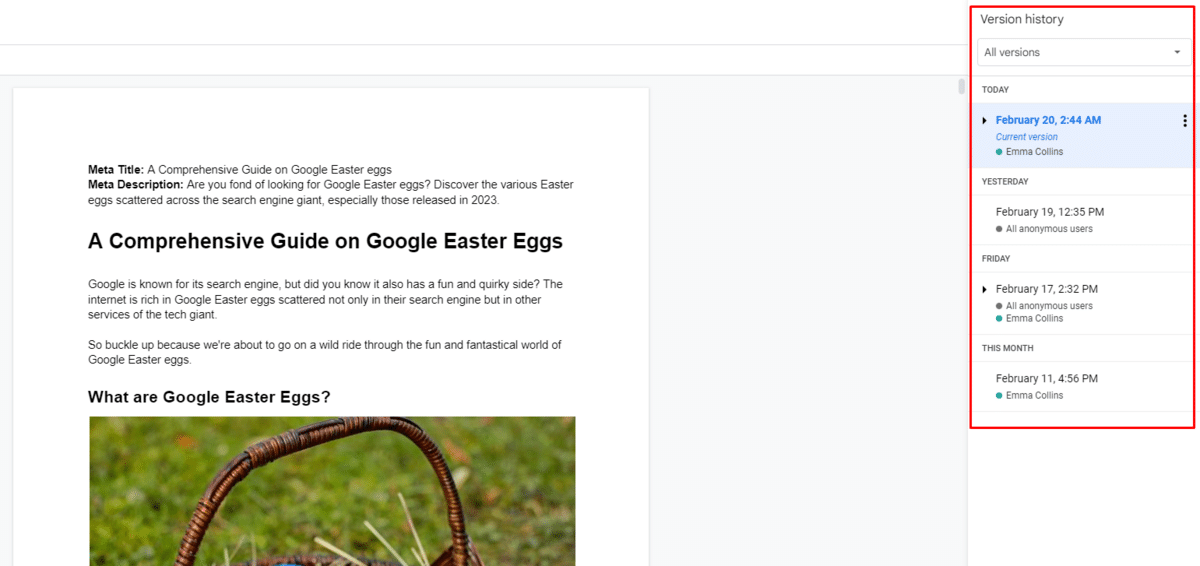
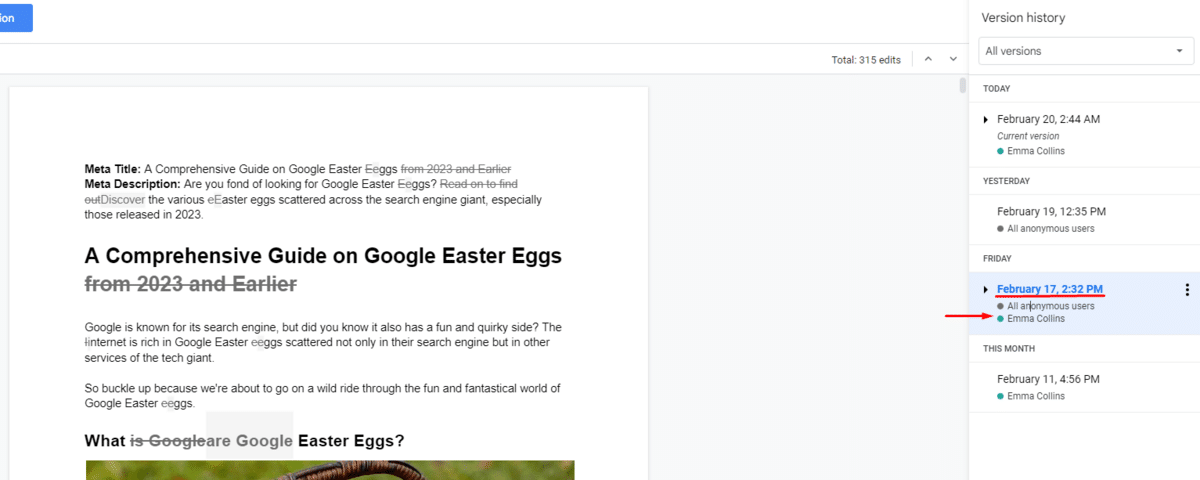
- If you want to see the changes made, click the different time stamps.
- You can also see who made the changes, as the editor’s name will appear at the bottom of each time stamp.
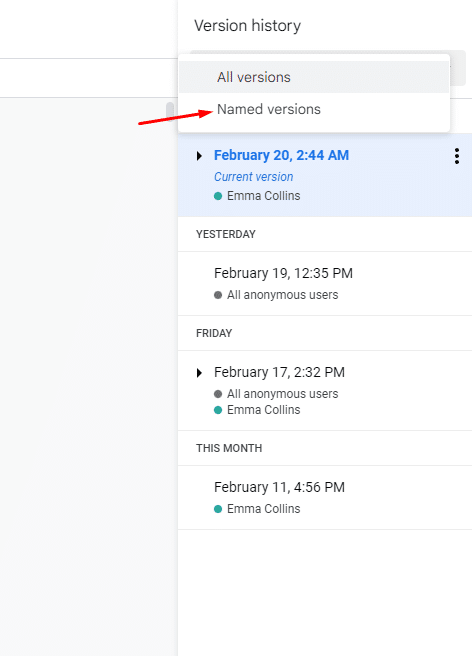
- To see versions named by the document owner or another collaborator, you can sort the list to show only named versions.
- This can be done by clicking on the selection above the version list and choosing “Named Versions.”
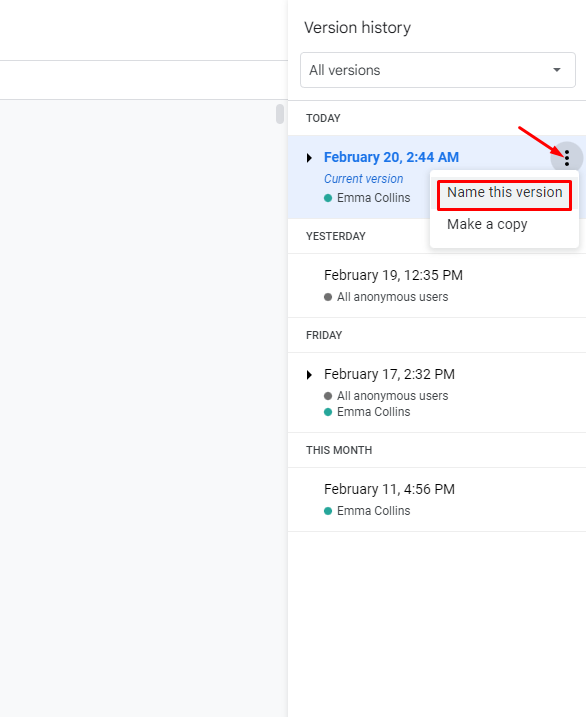
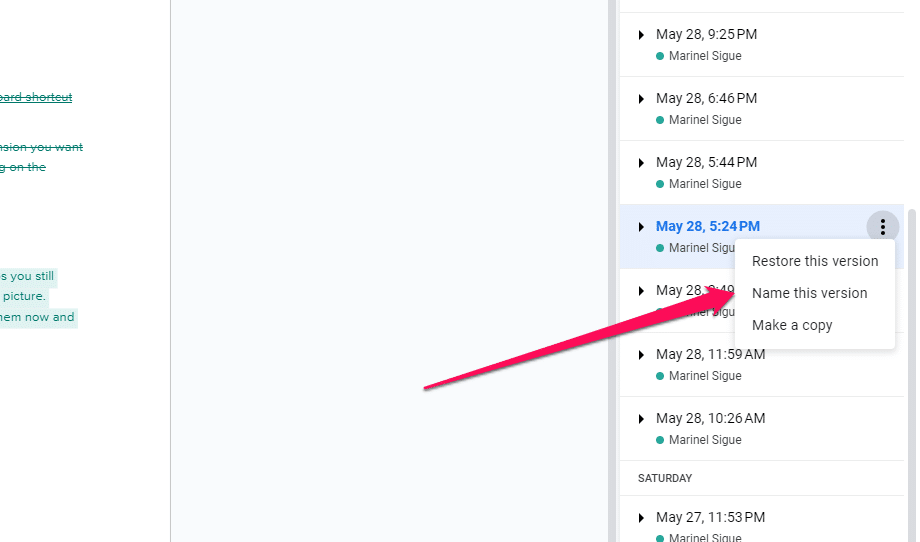
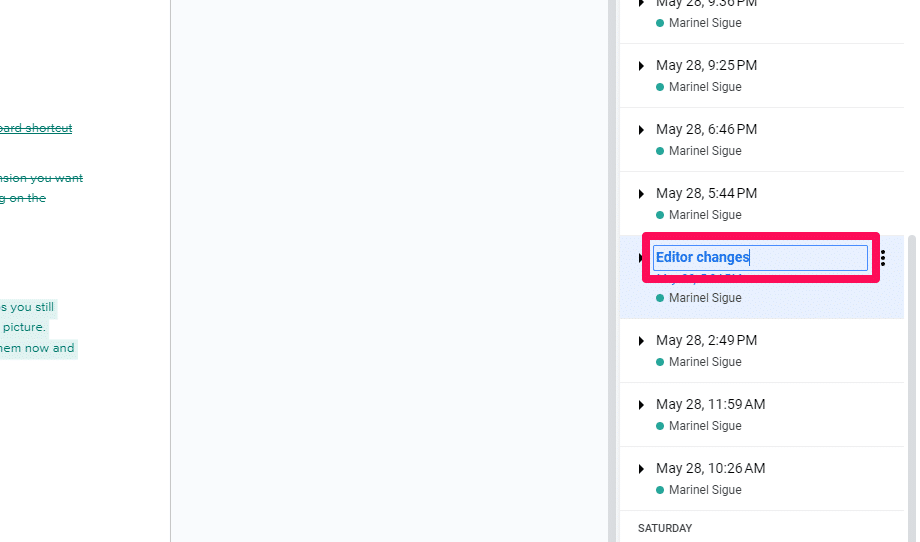
- If you want to rename the time stamps for each version to make it easier to track, click “More Actions” (three dots icon) on the right side of each timestamp.
- Choose “Name this version” and add the editor’s name.
- This will help you track who did what and when.
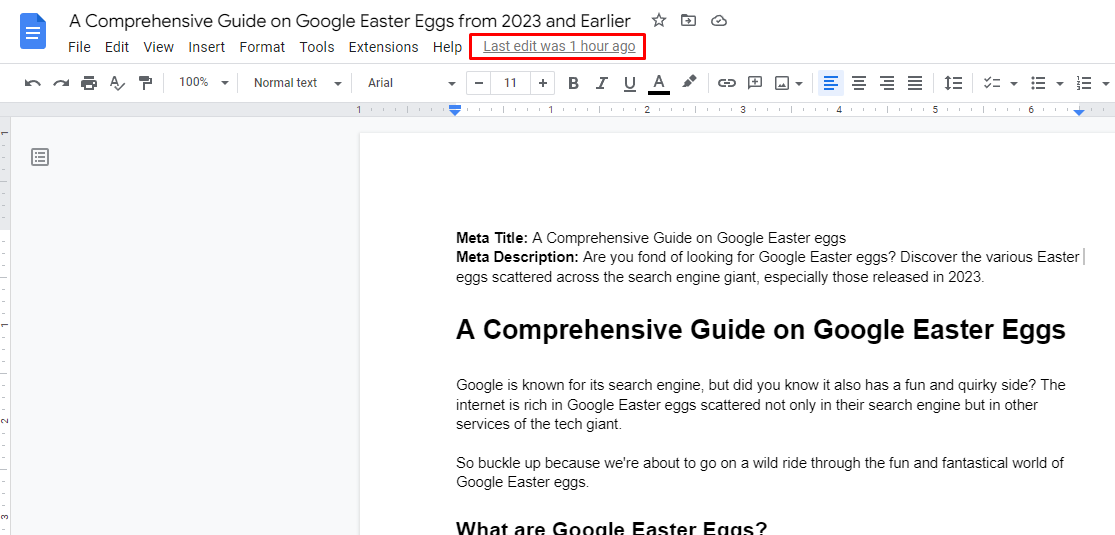
Alternatively, press Ctrl + Alt + Shift + H Windows keyboard shortcut or click the “Last edit was 1 hour ago” option above your document’s file name.
Note: This may vary depending on when you made changes to the docs file, which can be seconds ago, xx minutes ago, or xx days ago.
How To Track Changes on Google Docs Using “Suggesting Mode”
Another way to track changes in Google Docs is by activating “Suggesting Mode.” This allows you to make suggestions to the document, which the owner can accept or reject.
Note: This can only be done by the document owner. It’s a great way to see who suggests specific changes without permanently altering the document.
Here’s how to track edits in Google Docs using the suggesting mode:
- First, open the document that you want to make changes to.
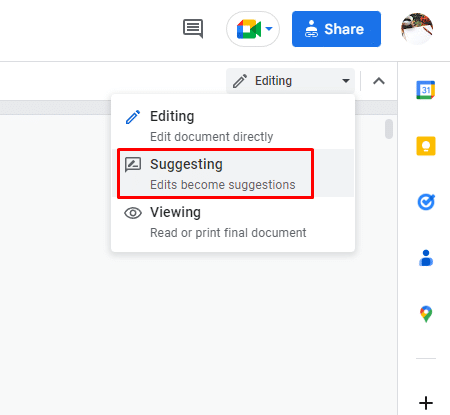
- Next, click the “Editing” button (pencil icon) on the top right corner of your document page.

- Upon clicking, a drop-down menu with three editing options will appear: “Editing, Suggesting, Viewing.”
- Select “Suggesting.” Doing so will enable you to edit the document without changing any original text and help you track any changes you make.
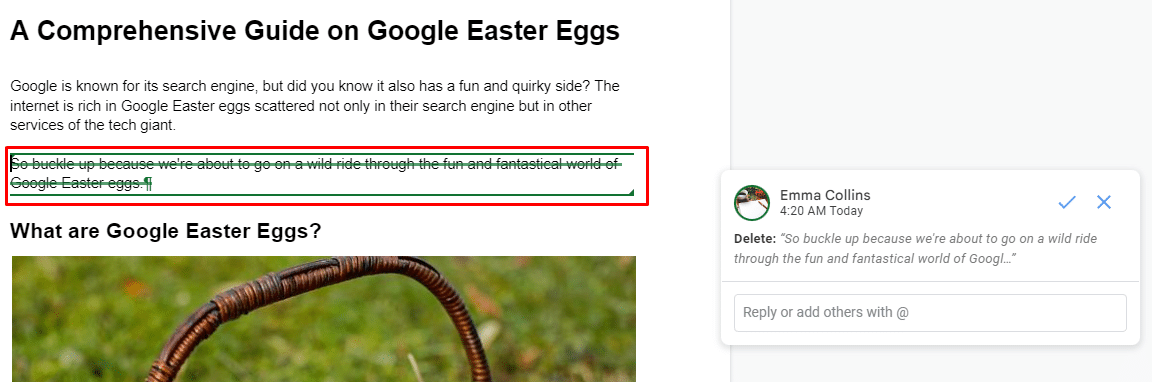
- Make the changes you want to the document.
- All your changes will appear in a different color and be underlined or strikethrough, depending on whether you added or deleted text.
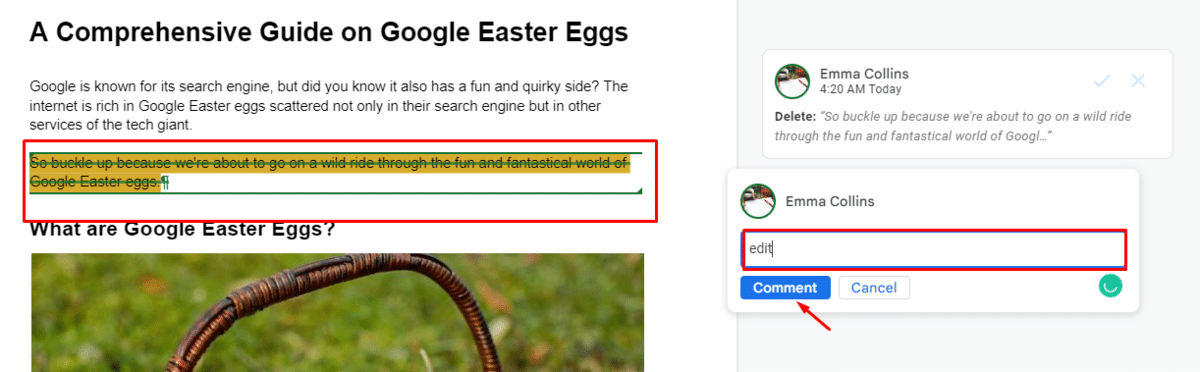
- Add comments to your suggestions by highlighting the text and clicking on the “+ Comment” button that appears.
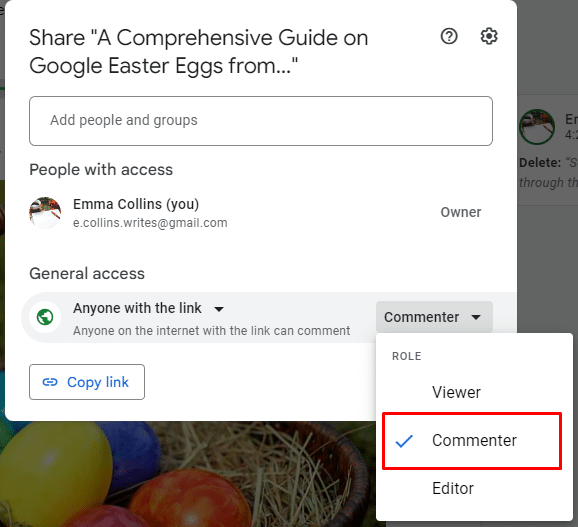
- When collaborating with others before sharing, you must select “Commenter” on the “General Access” roles.
- Any changes they make will appear in a different color, can be underlined or strikethrough, and noted as a comment on the side.
How To Accept or Reject Suggestions in Google Docs
If you’re the document owner, you will receive a notification of their suggested changes, which you can accept or reject. They can also reply to your comments.
To accept or reject suggestions, here’s what you should do:
- To get started, open the document with suggested changes.
- Then, click on the suggestion to review it.
- Next, select “Accept” or “Reject” to keep or discard the change.
- To accept suggestions, click the check icon.

- To reject a suggestion, click the X icon.

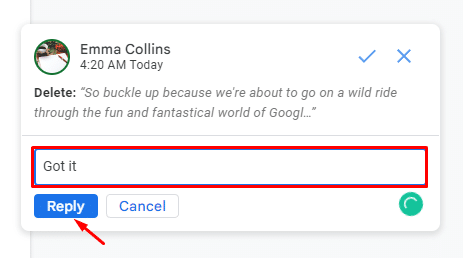
- If you want to add a reply to the suggestion, click on the comment icon next to it.
- Type your response, and click “Reply.”
And that’s it! Using the suggesting mode, you can easily collaborate with other users on a Google Doc while tracking changes and keeping the original content intact.
Don’t forget to check out our latest video on how to track changes in Google Docs!
[adthrive-in-post-video-player video-id=”LuCUpgHR” upload-date=”2023-12-21T14:28:44.000Z” name=”Version History in Google Docs” description=”To track changes in Google Docs, you’ll need to use the version history. Here’s how it works.” player-type=”default” override-embed=”default”]
How To Delete Version History in Google Docs
Sometimes, you edit a Google Docs file and realize you need a section of the content you’ve already deleted. Don’t panic: Google Docs’ version history shows you all of the edits you’ve made.
But what if you want to remove all of your edits entirely? There are two easy methods to delete a version history in Google Docs. Let me explain them below.
Method 1: Delete Version History by Using a New Document
Since version histories in Google Docs are created every time you edit a document, you can remove the version history in your Google Docs by using a new document.
Here’s how to remove version history in Google Docs using this method:
- Go to Google Docs and open your document.
- Open another tab and create a new document.
- Return to your original document and press Ctrl + A (Windows) or Cmd + A (Mac) to select the entire content.
- Press Ctrl + C (Windows) or Cmd + C (Mac) to copy the highlighted content.
- Go to your new document and press Ctrl + V (Windows) or Cmd + V (Mac) to paste the original document.
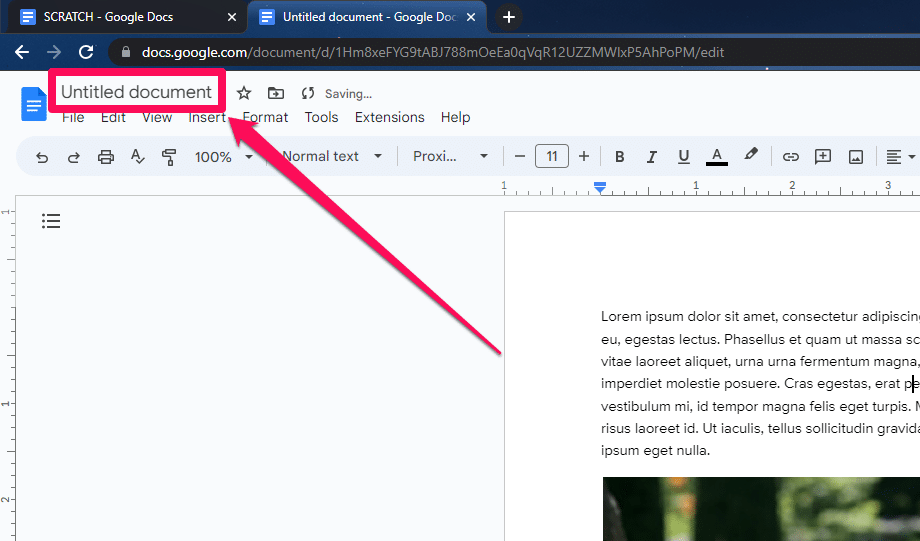
- Rename your new document by clicking “Untitled document” in the upper-left corner of the page.
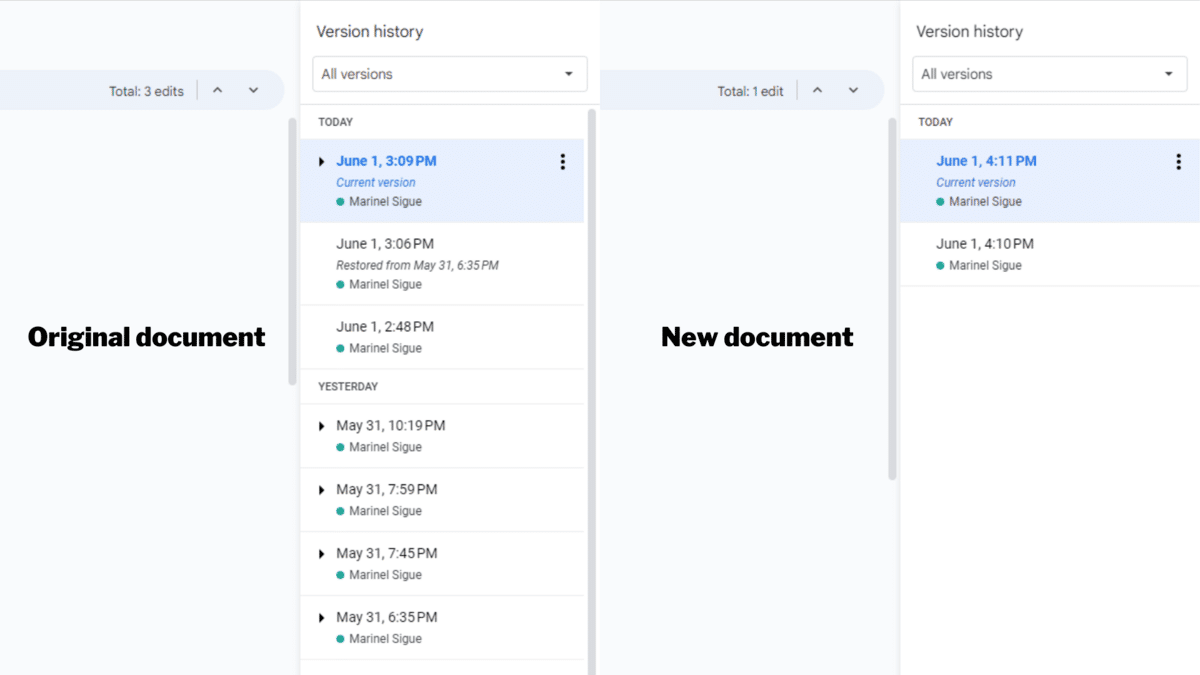
When you check the version history of the new document, you’ll see only two entries, which represent the document’s creation and the pasting of the content. These entries are much shorter than in the original document, making tracking any future changes easier.
Related: How to Share Google Docs [Quick Step-by-Step Guide]
Method 2: Hide Edit History by Creating a Copy of Your Document
Don’t want to go through the hassle of opening a different tab to create a new document? An easier way to delete the version history on Google Docs is by making a copy of the original document.
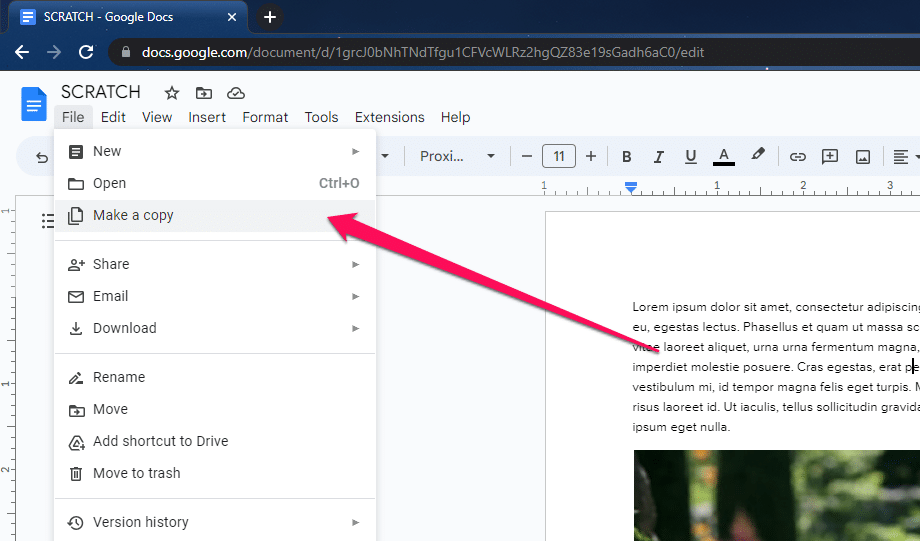
- In your browser, open the original Google Docs file.
- Navigate to the “File” > “Make a copy.”
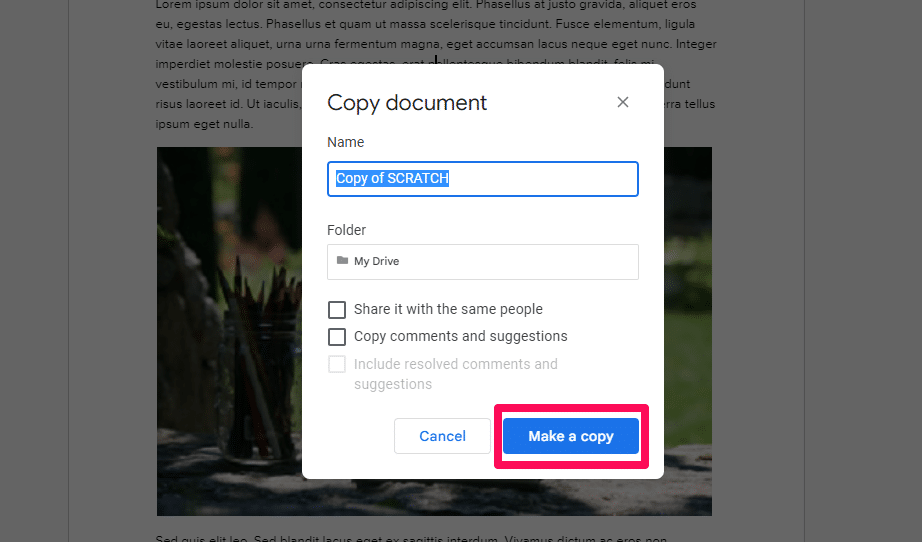
- In the pop-up box, type a name for your file or leave it as is.

- Press “Make a copy” to create a new document.
- Wait for the new copy to open in another tab on your browser.
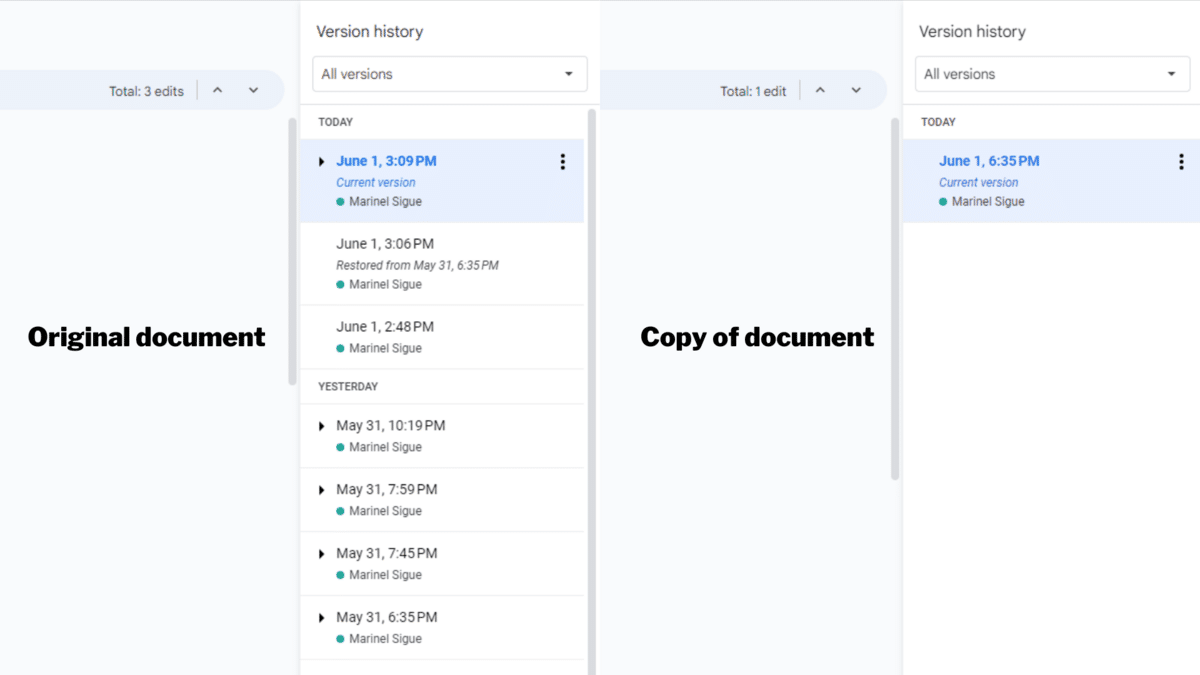
- When you check the version history of the copy, there will only be one entry.
Alternative Method: How To Hide Version History on Google Docs
Instead of deleting the Google Doc history, consider hiding the edit history on your Google Docs. While other users are blocked from seeing it, you (as the owner or editor of the file) can still view the entire version history. Follow these steps to hide the version history:
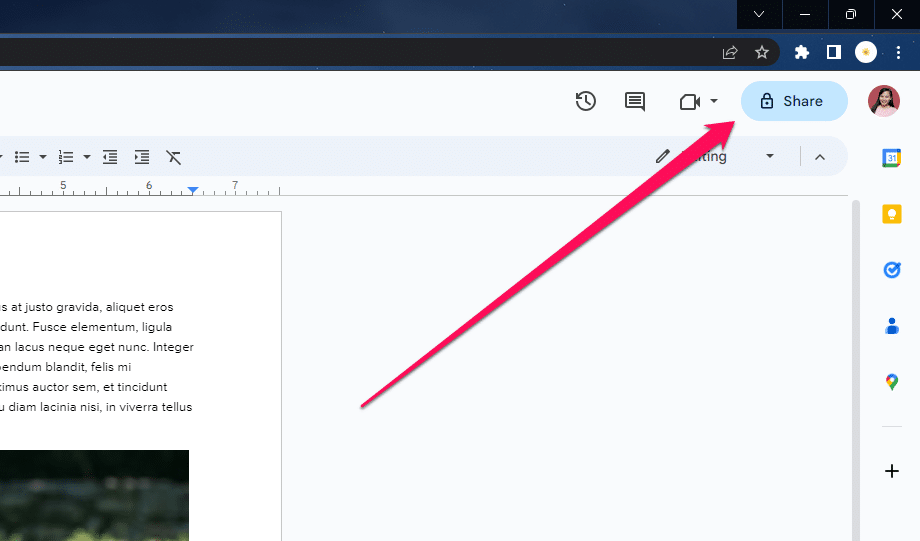
- Open the Google Docs file.
- Select the “Share” button at the top right.
- If you’ve shared the document with specific email addresses, press “Editor” next to their names and change each to “Viewer.”
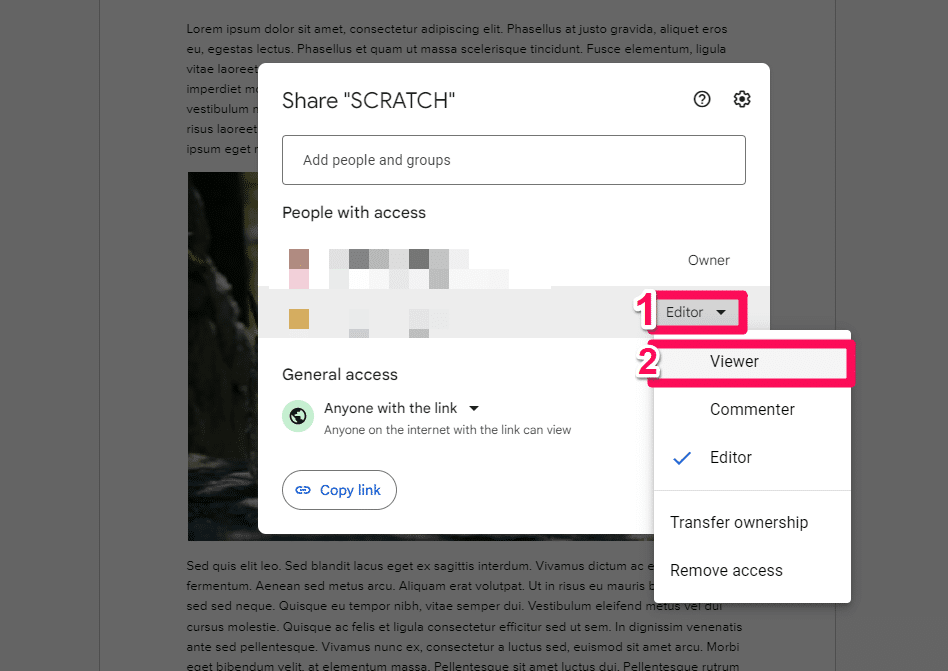
- If you haven’t shared the document with specific people yet, click “Restricted Access” and change it to “Anyone with the link.”
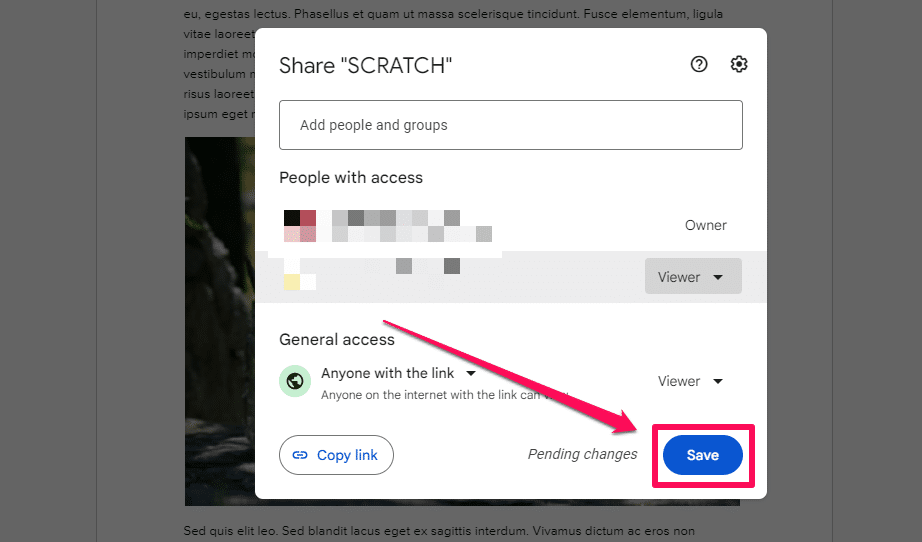
- Leave the access status as “Viewer.”

- Once you’re done, click on “Save.”
Anyone who opens your document will no longer have access to the version history (as shown here):
Bonus: How To Name a Version of a Document in Google Docs
If you’re frequently editing your Google Docs file, version histories can get messy — fast. In such cases, I name these document versions to avoid getting lost among the long list of changes.
Labeling specific versions makes reviewing it much easier if you need to restore or check past edits. Therefore, you can follow the steps below to name a specific version in your Google Docs:
- Open your Google Docs file.
- Go to “File” > “Version History” > “See version history.”
- Press Ctrl + Alt + Shift + H (Windows) or Cmd + Option + Shift + H (Mac) to open the version history.
- In the version history panel on the right, scroll through the list and find the specific version you want to name.
- Hover your mouse over the specific version and select the three vertical dots (⋮) next to it.

- Click on “Name this version.”
- In the text field, enter the name of the version.
- Press “Enter” to save the name.
- Repeat Steps 3-7 for the other versions you want to name.
- Note: Only 40 named versions per document are allowed.
Related: Google Sheets Version History
Tips for Tracking Changes in Google Docs
Here are some helpful tips for using track changes in Google Docs:
- Use suggesting mode: As mentioned, suggesting mode is a powerful tool that allows you to track changes in a document without directly modifying the original text. It’s a great way to collaborate while still maintaining the document’s integrity.
- Customize the display of the changes: You can customize how the changes are displayed in the document to make it easier to read. For example, you can show all changes or the ones that have not yet been reviewed. You can also choose to highlight the changes in a different color or add a comment to explain why you made the change.
- Use the “Resolve” feature: If you are the document owner and have multiple suggestions or changes to review, you can use the “Resolve” feature to accept or reject multiple changes at once quickly. This can save you a lot of time when reviewing a large document.
- Use comments to explain your changes: When you make a change or suggestion in a document, it’s a good idea to add a comment explaining why you made the change. This can help the document owner understand your thought process and make it easier for them to decide whether to accept or reject the change.
- Keep a clear communication: When using track changes, it’s essential to communicate clearly with others working on the document. For example, if you have questions about a suggested change, you can leave a comment to ask for clarification. Establishing clear deadlines and expectations for when changes will be made and reviewed is also essential.
- Review changes carefully: Before accepting or rejecting a suggested change, review it carefully to ensure it’s accurate and appropriate. Pay attention to details such as spelling, grammar, and punctuation, and make sure that the change fits with the overall tone and style of the document.
- Collaborate effectively: The track changes feature is an excellent tool for collaborating with others on a document, but it’s essential to use it effectively. Make sure that everyone involved understands how to use track changes and communicate clearly about any questions or concerns.
- Use keyboard shortcuts: Google Docs has several shortcuts to help you work more efficiently with tracking changes. For example, you can use “Ctrl+Alt+M” to insert a comment and “Ctrl+Shift+E” to turn the suggesting mode on or off.
By following these tips, you can track changes in Google Docs more effectively to improve the quality of your content while working more efficiently.
Frequently Asked Questions
What Are Track Changes in Google Docs?
The track changes in Google Docs feature allows a document owner to check who made changes to the documents they shared with others. It also helps them see which collaborators are actively working on the document. This same feature is also available in Google Sheets.
Why Use Track Changes?
Knowing how to track changes in Google Docs is a helpful tool that will allow you to track what changes were made and by whom. If you want to know about these changes the moment they are made, you can alter notification settings so you’re immediately apprised of such changes. Turning notifications on is also another feature that Google Sheets uses in the same manner.
Can You Track Changes in Google Docs?
Yes. Whichever change tracking option you choose for your Google Docs, you can see the changes made when you check. Whether you choose the suggesting or commenter mode or look at the version history, previous versions of your document before changes can be seen.
Can I Track Changes in Shared Google Docs?
Yes, you can track changes in shared Google Docs if you have editing permission on the file. We’ve shown you how to track changes in Google Docs with different methods above.
Can a Viewer See Version History in Google Docs?
A viewer cannot see version history in Google Docs and, therefore, can’t use Google Docs to track changes. Only those who can edit the Google Docs file can see the version history. This includes the owner of the file and any “Editors” access.
How Long Does a Version History Last in Google Docs?
Google doesn’t mention an official time limit for the Google Docs version history. However, over time, you might not see all of the versions in your document (as they’ll be combined to cut down on storage space).
Are Google Docs Tracked Changes Compatible with Word?
Yes, changes made in tracked changes in Google Docs will go with an exported Word document.
Wrapping Up
The track changes in Google Docs tool is especially powerful when collaborating with others, proofreading, and creating high-quality documents. Following the steps above, you can keep track of revisions and collaborate more effectively with others, ensuring your content meets the high standards you are looking for.
Related:
- The Free Google Sheets Task List Template [Easy Guide]
- The Best Google Sheets CRM Free Template [+ How To Use]
- Free Assignment Tracking Template for Google Sheets
- Free Balance Sheet Template for Google Sheets
- How To Hide Comments in Google Docs [Step-by-Step Guide]
References
- Google Support. View document history [Internet]. Google; [cited 2024 Jan 23]. Available from: https://support.google.com/docs/answer/190843
- Google Docs. [Internet]. Google; [cited 2024 Jan 23]. Available from: https://docs.google.com/